Prototyping websites and apps is one of the key skills of a UX practitioner. We rely on our prototypes to save valuable time and avoid building real features that are not user-centred. There is still a risk, however, that a lot of time is spent producing prototypes that may be discarded or changed after a relatively short period of time. With this in mind, I’d like to give some thoughts on what we can do to reduce the effort spent on producing complex prototypes without sacrificing the quality of feedback that can be obtained when they’re tested with users.
Context is king
If a prototype is being built for research purposes, time must be spent to ensure that it has the appropriate level of depth (i.e. the fidelity of the prototype is high enough to enable research participants to understand and test chosen aspects of it), but also the appropriate level of breadth (i.e. participants are given enough context as to where the prototype sits in the overall site or customer journey). If the prototype is a smaller part of a larger site or app, it’s often a necessary to replicate existing screens or elements in order to test it properly. For example, if we’re designing a new bank account application form, we may also want to test the ease of navigation to the form, the quality of information that is given before the form, or the clarity of next steps after the form is complete. Without duplicating content from the existing site, research participants may not have enough context to be able to test these aspects.
Journeys are hard to test
Testing full journeys rather than isolated pages offers many benefits but, of course, takes more effort. The amount of effort required depends on the prototyping method that is chosen. In many web projects that I’ve been part of, we’ve had discussions early on about whether it would be more efficient to create a prototype in HTML or use a ‘drag and drop’ tool (e.g. Axure or Sketch/InVision). If we’re using pre-defined style and an existing system of user interface components then the HTML option can save a lot of time, but, if we’re making large-scale changes to screen layouts, creating an entire new site, or a UI without a pre-built style, using a ‘drag and drop’ tool is often quicker. A third scenario exists that neither of the above approaches are particularly suited to, which is when a small number of changes are being made to an existing page. This might be a change in labelling or supporting copy, or it may a change of a single link URL that takes participants from a familiar point in the existing site to the new prototyped journey. Both the ‘drag and drop’ and the HTML approach involve laborious duplication of existing content, either through screen-grabbing or copying and pasting. The weakness of these prototyping methods becomes more apparent when we consider non-linear user journeys. How do we test a journey that starts with a Google search? How do we prototype a site-wide search that contains new options? The answer is often “we don’t.” Time or budget concerns often mean that prototyping the necessary interactions is unfeasible, especially if only one specific journey is being tested. This leaves it up to the research moderator to fill in the gaps and ensure the participant understands how the prototype differs from the intended design. This means the moderator must repeatedly use unbiased instructions and the participant is forced to continue using a prototype that they may not fully understand. Whichever method we choose, we’re either putting extra burden on the moderator, or on the user.
The solution
At Bit Zesty, whilst working with HMRC, we encountered a similar scenario. One of our recent projects was to improve the design of the UK Trade Tariff tool, which is a tool to provide people with information and rates for importing and exporting goods from the UK. Being part of the GOV.UK site, we were concerned with the findability of the tool. We were keen to consider how the tool appeared in search results and how it was linked to from other pages in GOV.UK. The size of GOV.UK and the technology behind it meant that we would have been unable to prototype these pages in a reasonable timeframe so we decided to investigate other tools that could help. The solution we found was essentially a live ‘find and replace’ that took live web pages and changed them in real time on our test computer. Our participants saw a version of GOV.UK that their web browser had modified whilst leaving the live version unchanged. Making changes using the browser allowed us to leverage the real GOV.UK features such as the search and the dynamic menu, which saved a lot of time, and made the site seem faithful to the original. We renamed the tool in the search results and tested whether the new name made it clear to the participant that they had reached the correct part of the site. 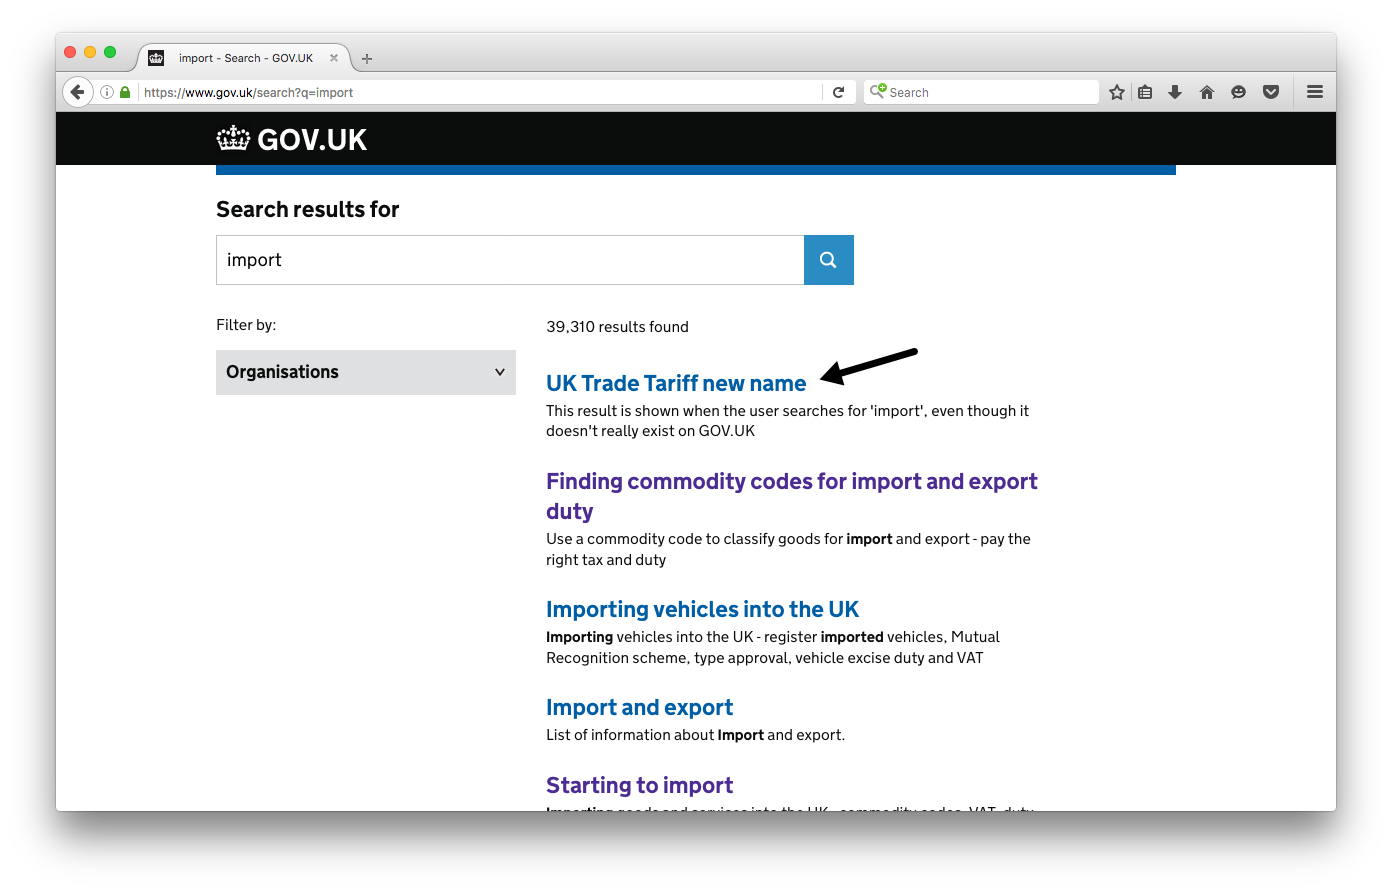 If the participant decided to click on the renamed search result, we were able to take them to a separate prototype of new screens that we had uploaded elsewhere. We built this prototype using Sketch and InVision, but we could have chosen any prototyping method that allows the output to be viewed in a browser. Our ‘find and replace’ process was based around two actions; text replacement and page redirection. This blog post on GOV.UK discusses how elements on pages can be manually replaced using the browser and our solution was an automatic process similar to this.
Setting things up
To perform the finding and replacing, we used the Firefox browser and some third-party addons. We used the FoxReplace addon for text replacement and the Redirector addon for page redirection. In the following paragraphs, I’ll explain the setup in detail so you can try the same technique for your own projects. These tools are available on Windows and MacOS so it’s important to note that you won’t be able to use them for iPhone prototypes. 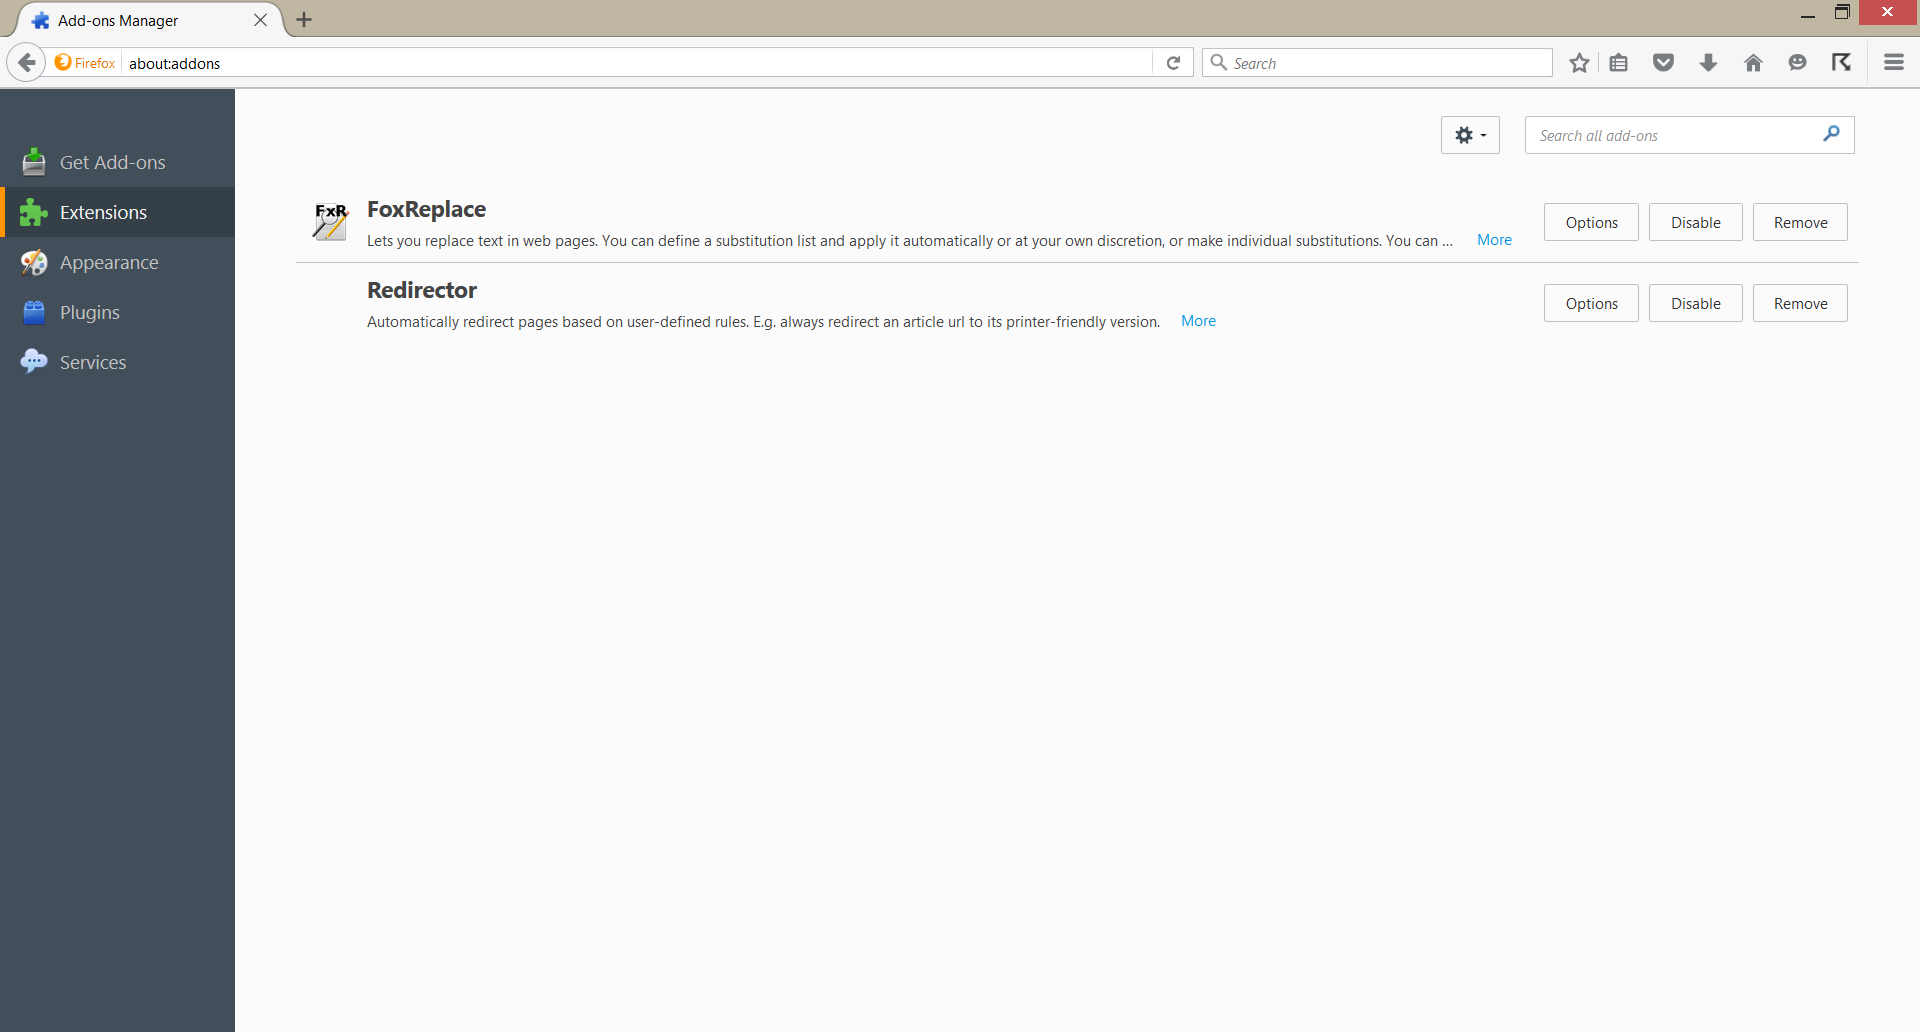 To install them, you will need to visit ‘Tools > Addons’ from the Firefox menu and search for each of the tools using the search field in the top right corner of the page. Once you have searched for each one, click the ‘Install’ button next to the addon name and restart Firefox. You should then be ready to configure each tool, as described below.
Using FoxReplace
The FoxReplace keeps track of pages that you would like to replace text in by grouping them into sites in the main options window. You can see that we have already added a site called ‘Trade Tariff’. You can add a new site by clicking on the ‘Add’ button in the top right. 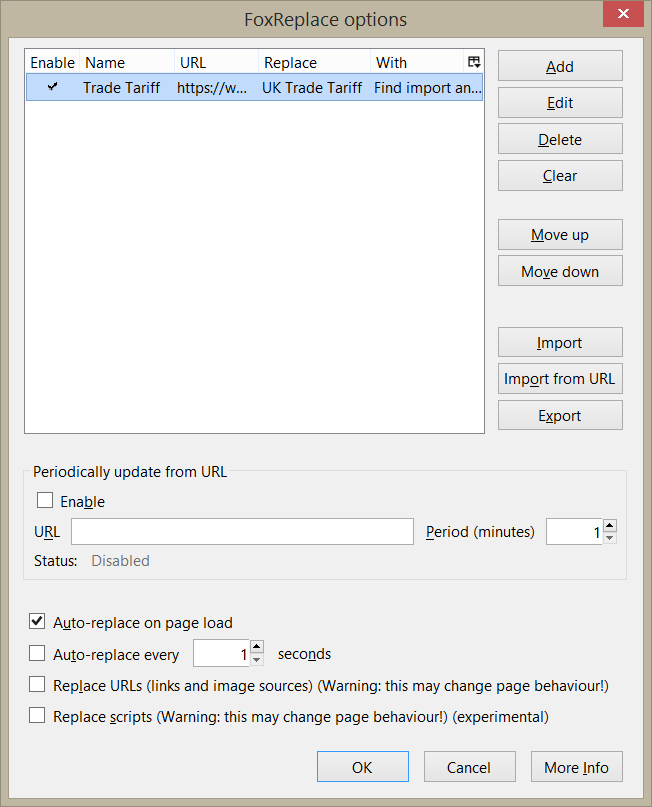 When adding a site, you enter the site name in the ‘Name’ input at the top. Next, you add the URLs that you would like replacements to happen on. To do this, you type a live web page address into the URL input and click the ‘Add’ button to add it to the list. When you specify which text should be replaced, all pages in this list will be affected.
  You specify these text replacements on the ‘Substitutions’ tab. They are added in a similar way to URLs. You can replace any text on the page, ranging from simple headings and descriptions to links and HTML form elements if required.
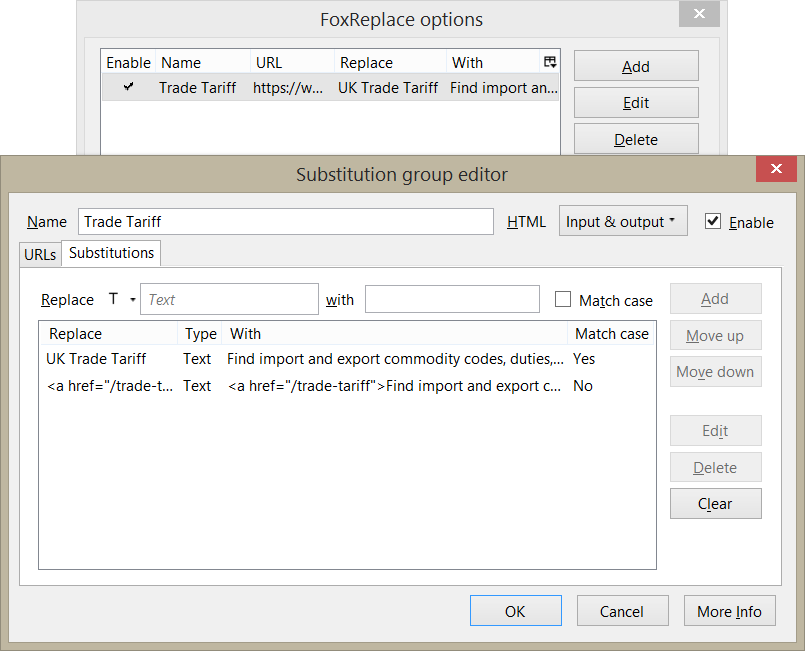
Using Redirector
We used the redirector plugin to send the user to our prototype whenever they visited the live URL. This means that they would have seen the prototype version if they had accessed it directly via Google, via GOV.UK or by typing the URL into the Firefox address bar. You can see from the main Redirector page that there are several redirects set up. To set up your own redirect, you need to click on the ‘Create new redirect’ button. 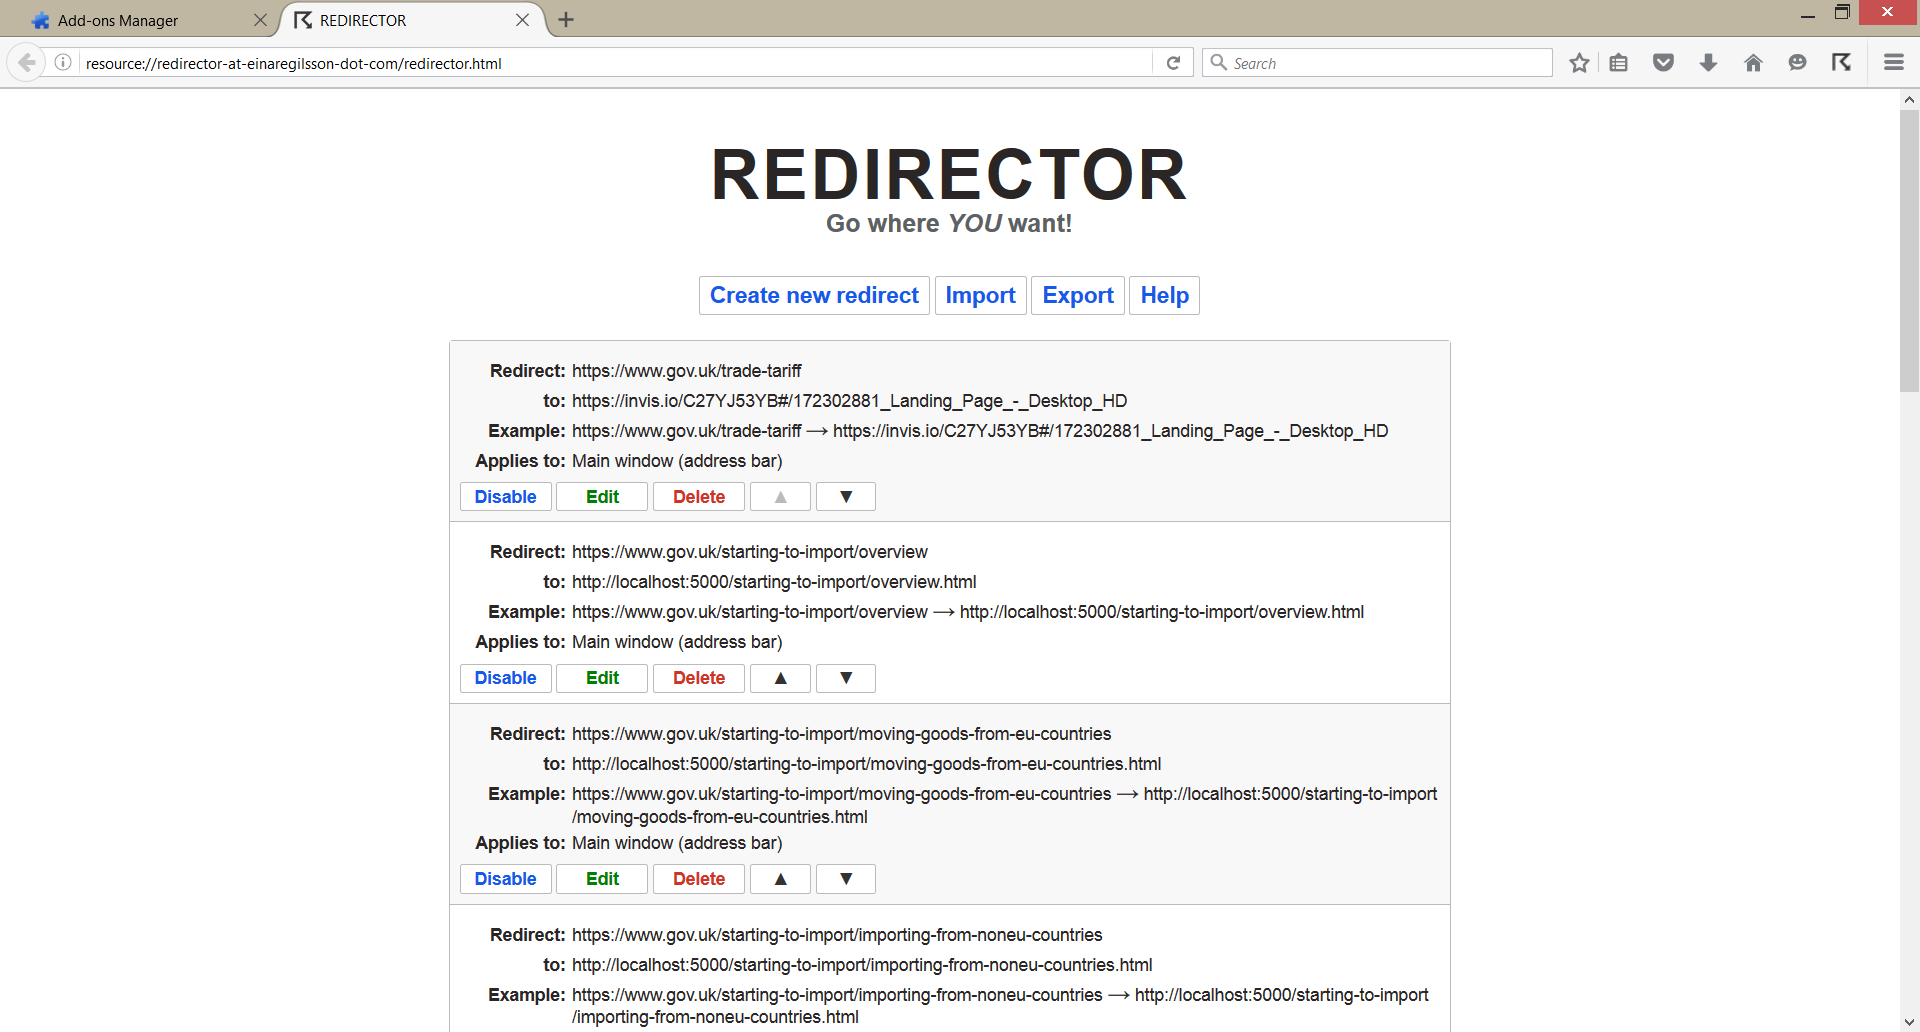 From the dialog that appears, you should type in the live URL into the ‘Example URL’ and ‘Include pattern’ inputs. You should type the prototype link into the ‘Redirect to’ input and click ‘Save’ to finish.
 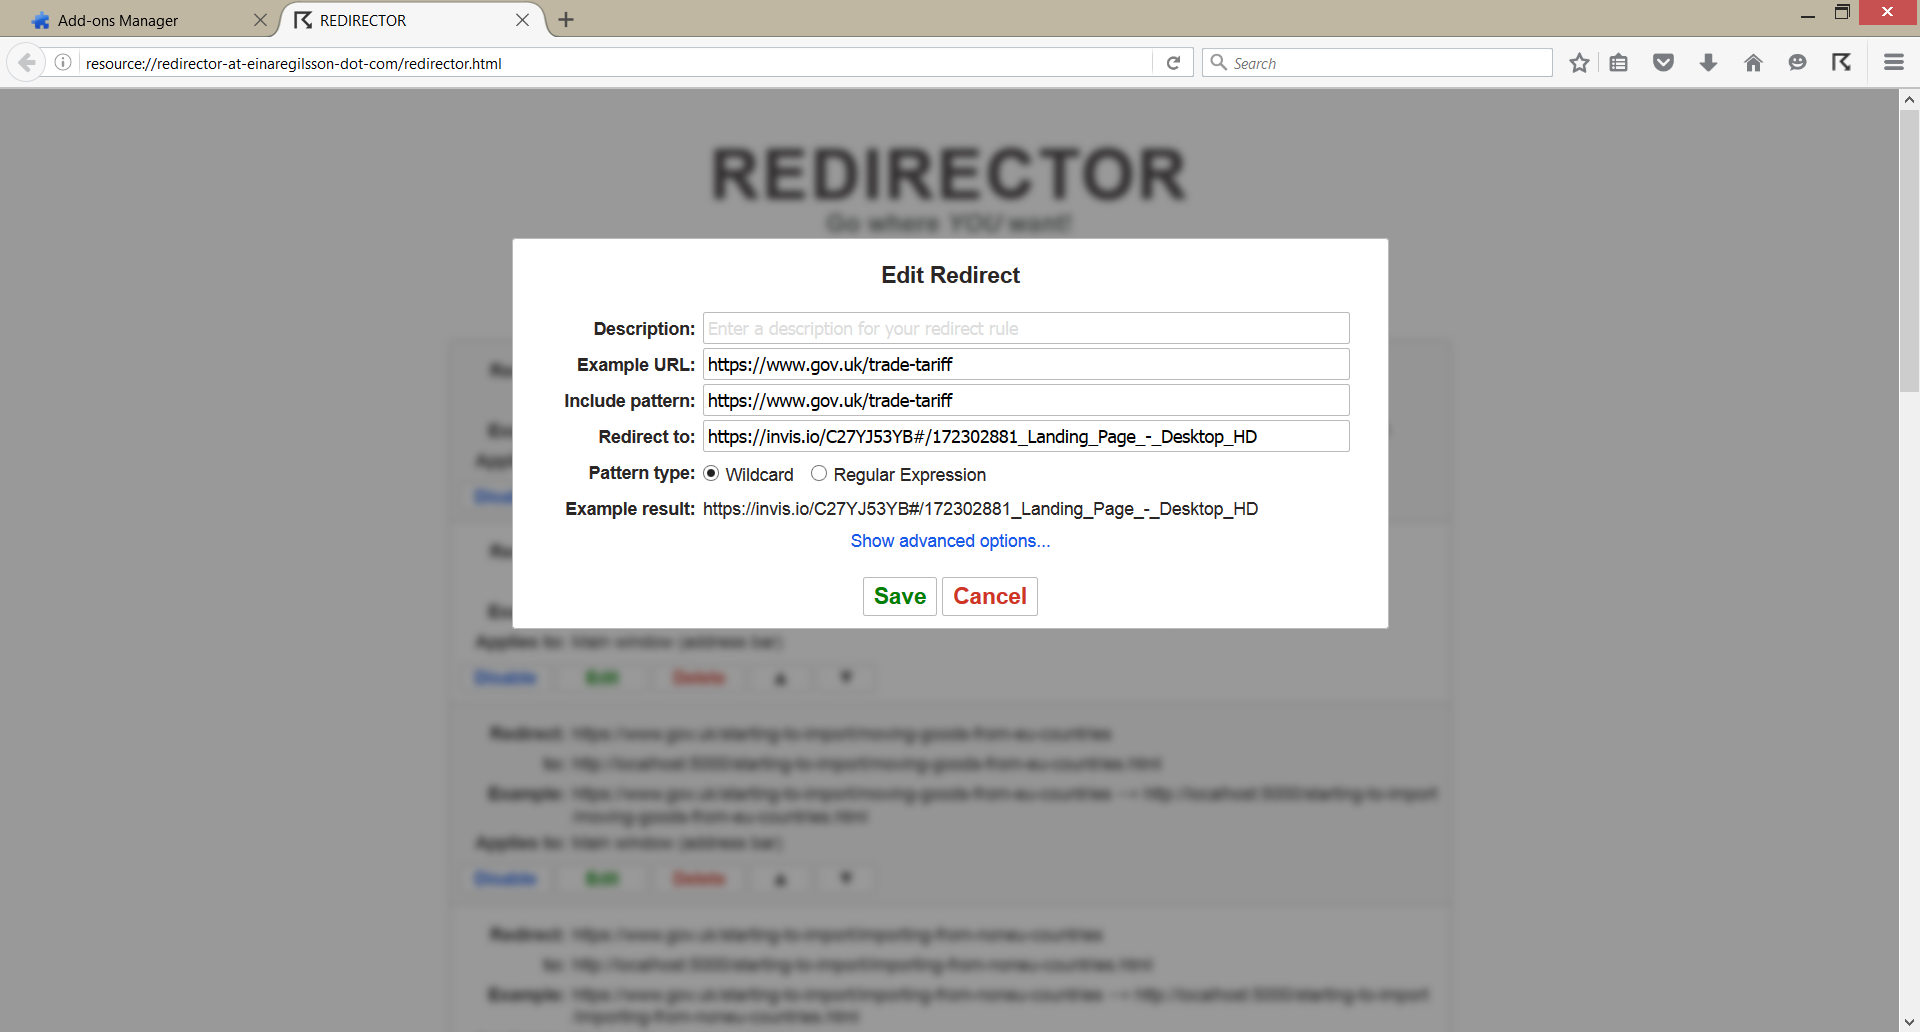 In addition to the prototype tool, we also directed the user to several rewritten guide pages that exist in different places on GOV.UK. Rather than using FoxReplace to change the content of these, we saved the live pages to our local computer and edited them using a text editor. If you are making large-scale changes to any live pages, you may want to save the page using your browser and make changes to the page’s HTML.
 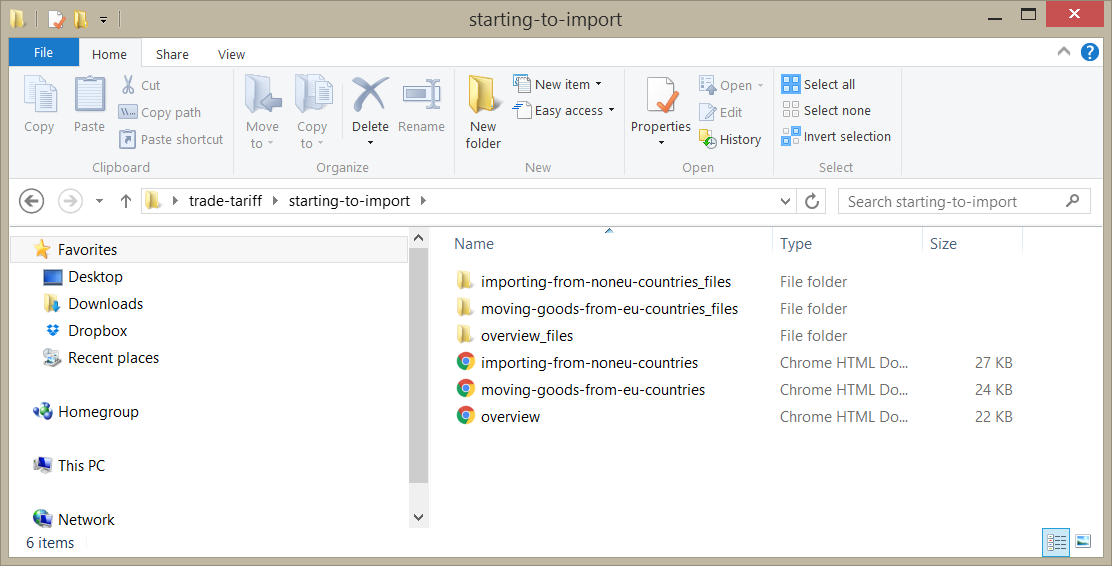 Having made changes to the HTML pages, you have the option to upload them to a web hosting service or create a local host so that Redirector can access them. We decided to run a simple Ruby server on our testing computer to keep the pages saved to the desktop but allowed them to be viewed by visiting https://localhost:5000 in Firefox. There are any different ways to set up a local web server. You can use one of the options shown here if you are comfortable using the Terminal, or use a tool such as XAMPP.
 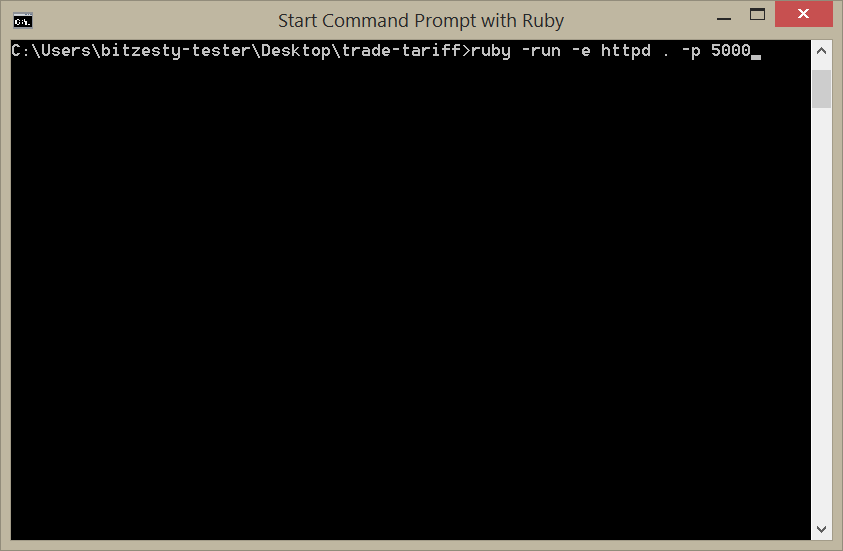 If you have Ruby installed, you can start a local Ruby server by typing the above command into your Mac Terminal or Windows Command Prompt. After setting this up, you should add the local server URLs to the ‘redirect to’ input in Redirector.
 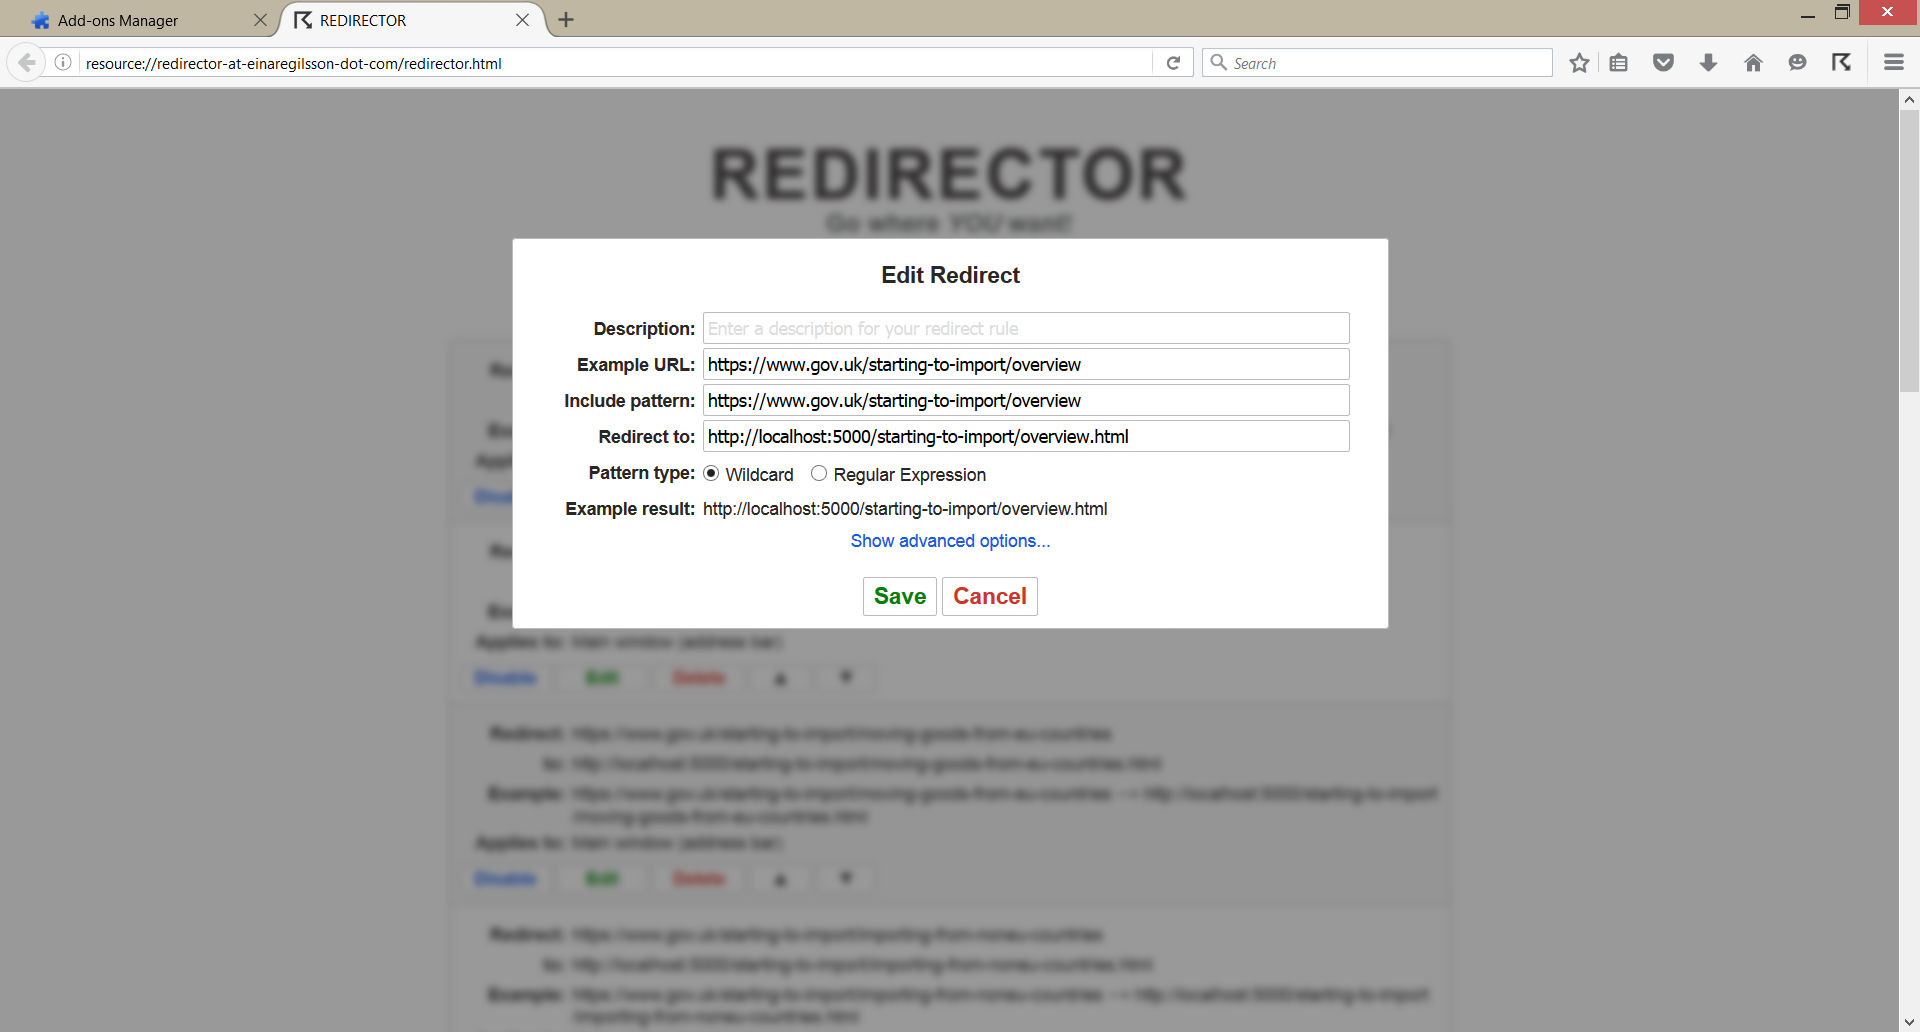 Assuming that you have entered all of the URLs correctly, you should be all set.
Putting the technique into action
Overall, these tools became invaluable during our Trade Tariff research. They allowed us to test findability and labelling in a more thorough way, giving us richer feedback to help iterate the designs. However, while trialling the technique, we made some observations that you should bear in mind if you decide to use it yourself:
- The local server setup isn’t for the faint of heart For technical-minded people, setting up a local web server (as shown above in Ruby) is a relatively straightforward process but some people may not be confident with this step, especially during the pressures of running research sessions. If this is the case, it may be worth writing down the necessary commands in a text file so they can be copied and pasted into the Terminal when needed. It may also be worth having someone on-hand that can provide support, should any problems occur.
- If the plugins are misconfigured, research sessions can be seriously disrupted If the prototype is properly checked before it is used then this should not be a big issue but it’s worth bearing in mind that, because the Firefox plugins require you to provide exact text and URLs for substitution, there is a risk that typos will occur. For example, if a ‘redirect to’ page is missing the file extension, this will create a dead link and the participant may not be able to continue. You should make sure to allocate enough time to check all the links thoroughly and conduct a pilot test so things run smoothly.
- The Redirector substitutions list can become unwieldy without comments Depending on the size of the prototype, there may be numerous URLs that need replacing with Redirector. Without a clear naming convention in the substitution ‘Description’ fields, the configuration page can quickly become a confusing mess of links. This means that making changes becomes a much bigger task with a higher chance of mistakes. Give each substitution a sensible description when you create it to keep things organised.
- Not all platforms are supported The addons needed for this process run in the desktop version of Firefox. If you can test your prototype on a desktop or laptop computer then you are in luck, but it’s unlikely that the process will work on mobile or tablet.
- Using tools like InVision won’t always give you a seamless prototype For those that haven’t used it, InVision gives you a place to make your Sketch or Photoshop designs clickable and host them online. You can take several static screens and use InVision to add links from one to another and use a web browser to navigate them. Although you can make the pages behave in a similar way to a live website, you’re likely to see a short InVision loading screen when you land on the first InVision page. This doesn’t create a huge barrier but it may be a giveaway to participants that they’ve landed on the correct page. This has potential to bias your research so make sure that loading screens don’t affect what you’re testing.
With these things in mind, it’s apparent that the find-and-replace approach will not be suitable for all prototyping tasks. There will be many cases where a full HTML prototype or a standalone drag-and-drop one will be a more efficient solution. For each project, you should consider whether this approach is right for the task. This is more likely to be the case if you are:
- prototyping minor changes to search features
- prototyping minor changes to heavily interactive features
- conducting user testing sessions that involve Google searching
- conducting user testing sessions that involve typing in URLs
In the right situations, the find-and-replace method saves unnecessary prototyping time and it allows user research sessions to run more smoothly, reducing research bias and simplifying the process for the research moderator. The approach has worked successfully for me. If you try if for yourself, we’d be interested to hear your thoughts. Let us know on Twitter (@bitzesty).